The ATS11A-10 is a 230V/10A automatic transfer switch made by BayTech. You power it by connecting two 230V lines and it will output 230V. If one of the input line fail, it will switch to the other one.

It has worked very well for me during a few years, but one day it completely failed: it wasn't outputting anymore voltage, shutting down all my network equipment. Yes, an ATS is a SPOF.
Please note: I didn't have a camera when I repaired it, so all the photos here having been taken afterwards. Nonetheless, it's not really difficult to understand with the following pics.
This ATS is very easy to open, there's only 4 screws on the top:

Luckily for us, the BayTech ATS is quite well made and is using through-hole components instead of SMD.
Nothing looks burned at all, so it may be a good news.

We can clearly see a PSU in the middle, which is used to power the whole switching part of the ATS. So I decided to power up the ATS11A and check the voltages IN and OUT the PSU: I could find the 230V but there was no output voltage.
I unscrewed the main board, it's easy with only 5 screws on the bottom of the unit:

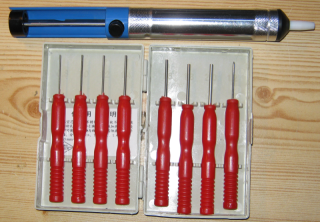
So, I decided to desolder the dead PSU, it was quite difficult because the main PCB is double sided with plated-through holes. I used a solder iron, a desoldering pump and also a hollow needle.

Check this video if you want to learn how to use hollow needles to desolder components.
I found a PSU with the correct characteristics and size, its reference is "S-15-12":


This PSU has a metallic enclosure which is a bit too big to fit in the ATS, so remove it. You probably want to keep the insulating plastic thing on the bottom of the PSU.
Now, solder the output wires on the PCB and tighten the terminals' screws of the PSU (check if your PSU really has it's + and - outputs like mine, if you reverse the polarities the ATS probably won't like it much…).

Solder the two input wires and tighten them to the other terminal (on Neutral and Live pins).
Have a look at the back of the PCB to see where to solder the four wires:

Finish up by fixing the PSU the best you can: with double sided tape and/or insulating tape. Pay attention to isolate the PSU from the ATS' PCB and also isolate the top of the PSU so it doesn't touch the top plate of the BayTech when closed. You can also stick tape on the inside of the top plate, to be sure it's really well isolated.
You can often find this exact PSU by searching the reference "S-15-12", it's a 12V/15W (1,25A) version.
You can certainly use another PSU, just make sure it is powerful enough, the correct voltage and not too big, this one was just the perfect size.
You can buy it on eBay:
here
or
there.
If you prefer AliExpress, the S-15-12 PSU is available here or here.
To fix the PSU and keep everything insulated, I use heat resistant adhesive tape, aka Kapton® (the yellow transparent tape you see on the pics). Buy some on eBay or AliExpress.
You can find hollow desoldering needles on eBay or AliExpress